Pages

Saturday, December 3, 2011

Button Number 4

This is the fourth button in what will be loads more☺

This button was made using silk velvet with a silk brocade in the centre. The fabrics where given to me by a very dear friend Isabell xx I have cut the centre of the velvet out & then done a buttonhole & needle laced edge around it. The brocade was secured on by a running stitch around the buttonholing. I have then finished off the button by adding some silk ribbon french knot roses. This is the first time I have used the silk ribbon frech knot roses, & I have to say I love them & will be using this stitch a whole lot more in my embroideries☺☺
Big Hugs Your Friend
Elizabeth xx

Button number 3

Well here I am again with button number three ☺ I had a lot of fun making this button.

I have used a cotton muslin, or in this case I think it was some bandage material that I had that was not being used. I have created the puffs & then filled them with a soft toy fill. Once the puffs where done I then sewed them onto a piece of cream cotton, & then embellished them with different types of beads, buttons & embroidery stitches.

Stay tuned for button number 4 coming your way soon ☺
Big Hugs
Your Friend
Elizabeth xx

Monday, November 28, 2011

Button number 2


This is the second button I have made while doing Karen Ruane's button workshop.

I have used a silk dupiont, & done needle woven bars in a white cotton a broder. Too one of the bars I have added a little needle lace, & then I have done two web stitch wheels & added french knots & beads to give the button a little sparkle.

I need to go & buy some more self cover buttons now :-)
Your Friend
Elizabeth

Buttons

This is the first of what will no doubt be many embroidered covered buttons. The base fabric for the button is silk noil & has been embroidered using a range of cotton threads. Cotton a broder, Primke vairigated cotton threads in size 8 pearl & stranded. You can email me if you wish to purchase these Primpke cottons as I sell them. I have also added Mill Hill seed beads as well, which I also sell.

The finished button measures 4.8cm.

Stay tuned as I hope to have the next button up sometime today or tomorrow. Just doing the finishing touches on it.
Your Friend
Elizabeth

Saturday, November 26, 2011

Where Have I Been!!!

WOW!!!! I cannot believe how long it has been since I last posted anything on my blog. Sorry everyone. I have been so busy. I cannot believe either that it is nearly Christmas as well! Where has the time gone.

I am hoping to dedicate a lot more time to blogging next year. I have so much planned for the new year. And will do my very best to share it with you all.

I have signed up to do Sharon B's TAST next year, so will be putting up photo's of my progress with that. If anyone would like to join in on the Take A Stitch Tuesday you can visit Sharon's blog on www.pintangle.com

I am also planning a workshop or two, in Stumpwork embroidery. That is what has been keeping me busy & away from my blog. All the preperation of samples & notes.

Currently I am doing a workshop on the web with Karen Ruane, on buttons. You can see her work on www.karenruane.blogspot.com her work is amazing. She makes white on white look amazing & not scary☺

Well that's it for now. Hope everyone has an amazing Christmas this year & a great New Year. I hope to be back soon with some photos of my buttons. But for now will say Cherrio.
Warm Hugs
Your Friend
Elizabeth

Thursday, July 21, 2011

Contents of my Art healing journal

Here below are some photos of my art healing workshop that I did on the willowing website. Do go take a look at this website it is great.

This is the front page of the book, it is all about what I love most, tea & all things associated with tea.

This page is a self portrait☺☺ I have since added to this page some stamping & also the words "Freedom to be me"

On these pages I have done another self portrait only this time I am dressed☺☺ & having tea with a friend. This is a part of my whimsical. The sign is the recipe for friendship cake. And goes like this:
1 cup of greetings
1/2 cup of smiles
1/3 cup of Love
1 tablespoon of Sympathy
1 Lge Hug 1 cup of hospitality

Cream greetings & smiles thoroughly. Add hugs mix well. Then add love & continually stirring in sifted sympathy & hospitality. Serve with Humility.


This page is filled with all of my favourite things to do with Tea.

And this page is filled with some of my friends from the UK's Embroiderers Guild forum. I want to do more pages like these filled with all of my friends whom are very dear to me.

On these pages will be the paper dolls that will become books in themselves, that I will fill with all of my dreams and aspirations.
I have enjoyed doing these pages & hope to continue to do more. So keep watching for more installments. ☺☺
Big Hugs
Your Friend
Elizabeth xx

Tuesday, July 19, 2011

Books

In previous post I think I have mentioned about my next love other than embroidery. Yes you guessed it! Books. I have been making books now for about three or more years, & just love everything about them.

This one pictured here is the latest book that I made & is my Art healing journal. I am filling the journal with art works & things that I love. Tea Pots, Tea cups & all things tea These two little books where inspired by a matchbox zine challenge I read about & entered on the web. The little brown book at the front is the matchbox zine that I made for the challenge, & it is fill with tiny photos of all the embroideries & work I have done over the years. It also has some embroidery, both machine & hand inside it, & I have also added samples of experiments that I have documented. The book measures 2 1/2 inches by 3 1/2 inches
This book is a type of pamphlet binding & has been beaded for extra interest.
This book is also a pamphlet bound book. But I have needle weaved each of the booklets together to create a fuller book. The cover is made from pressed paper clay, that I pressed onto a Chantilly lace rubbing plate.
This book shows both Coptic & Celtic binding. Each of the signatures in this book are coloured & the book is used to keep a record of everything I have ever tried or used in both textiles & paper craft.
I hope to add more books in the future & will be adding them to my etsy shop, so keep watching this space.

Big Hugs
Your Friend
Elizabeth xx

50 Drawings with Carolyn Sullivan

Hello All
Here I am yet again. I know it has been a while, but I have been very busy making & creating.

On the 3rd & 4th of this month July, I did an amazing workshop with Carolyn Sullivan. We had to choose a piece of Textiles from the Guild collection as our inspiration & then creat 50 drawings. This is the name of the workshop. 50 Drawings.

Below you can see some of the things that I have done in this workshop. I do hope to get around to doing a lot more as I am no where near the 50 drawings as yet.

The piece that I chose to do was a piece from the UK's Embroiderers Guild collection. It is a piece that I love & have in the past done work from it. You can see what I did on module one's homework from my city & guilds course.

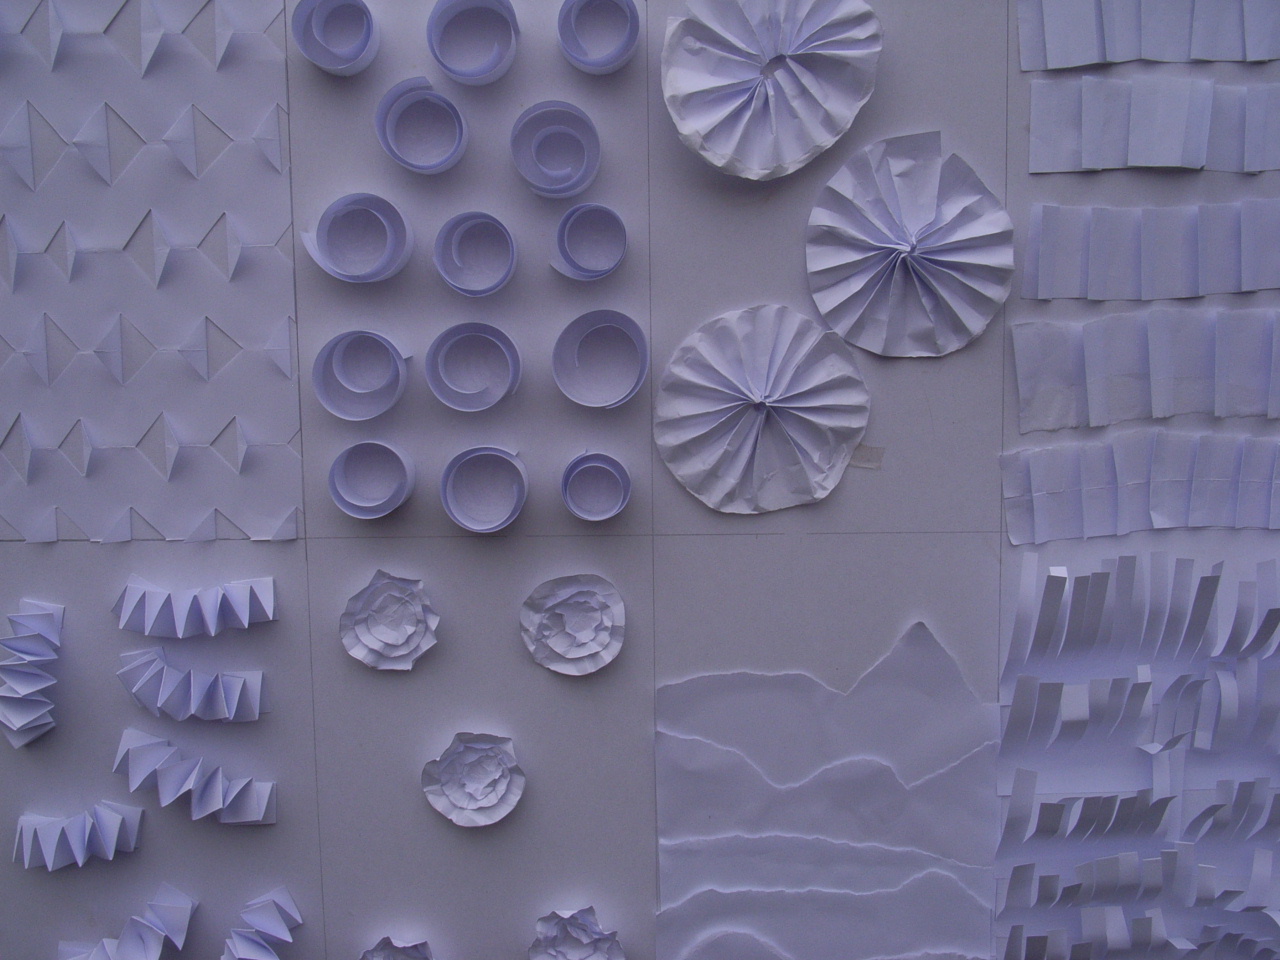
Here are some photos of the 50 drawings workshop:

The workshop was not as scary as I thought it would be doing 50 drawings☺ Most of our drawings where made with paints & papers. There was a little drawing on the first day☺☺ On the first day we made a book from just one piece of paper, then on pages 4&5 we had to glue a piece of newspaper to one & scrunched up tissue on the other.


Page 1:


Page2:

Page3:
Page4:
Page5:

Then we had to turn back to pages 1, 2 & 3 & divide these into four. On page one we drew sets of dots in each of the four sections. Then on page 2 we had to draw horizontal & vertical line patterns in each of the sections, on page 3 we combined dots & lines. On pages 4 & 5 we had to do the line & dot combinations again only this time we where not working on plain white surfaces.


Page 6 we had to create a collage of some of the papers we brought with us, then on pages 7 & 8 we has to do the line & dot thing again only this time we did them in collage & only page 7 had any drawing on it.


Page6:

Page7:

Page8:

After that exercise we then took our designs that we took with us, & had to pick out a small section of it to work with. We then glued this onto some of the coloured water colour paper we brought & then had to do a water colour wash over the top. We then choose just one element out of this design & drew it & enlarged it to fit our pages. This was what we used for most of the workshop, this one element. I chose a butterfly.


On the next page we had to then draw our butterfly well i drew a butterfly☺ & using either dots or lines we had to shade it it creating shadows. From this we then chose an element from the butterfly to then create a collage for a back ground. I chose the wing shapes to create my collage once we made a background we then added lots of our design.


Then to end the day we made some rubbing plates ready for the next day. These where from our drawings & where made by drawing our designs on some card with PVA glue. When the glue was dry they created the rubbing plates.


Pages 1&2

Pages 3&4 I have used the rubbing plate created the day before & used oil pastels to do the rubbing. Afterwards I have then added a water colour wash.

Pages 5&6: Page 5 I have used the rubbing plate & a candle. Then done a water colour wash over the top. Page 6 I have drawn on the butterflies then cut out some of the elements of the butterfly to reveal what is on the page behind.

Pages 7&8: These pages I have just done a water colour wash over. You can see the cut out from the previous page.

Pages 9&10: On page 9 I have taken some of the papers I painted up for the workshop & cut & weaved them back together again. On page 10 we had to create four small collages, but had to treat each one differently. Progressing from the first one.

Page 11: On page 11 we had to creat a collage tieing together everything that we have done over the two days, & adding the design that we started with.

These pictures below are the same as most of the above photos the only difference is that I have added elements to them.


Here on day two we played with mono printing. Taking a positive & negative print of our designs.


This collage that I did on day one still needs some work doing to it. I am going to add some of the butterflies.

Day two of the workshop was very full on. In the morning we all sat around & listened to the tutor give us some demos of what we had to do for the rest of the day. There were about 9 in total. That kept us relatively busy till lunch time, Then after lunch we watched a short DVD from Jean Littlejohn about sketch books. Then the tutor gave another short talk on some design ideas that we could work on at our own leisure.


Then we went off & played for the rest of the day☺ It was very relaxing & very informative & great seeing what everyone else was doing with what we had learned.


I am still working on these pieces & adding to them. I still have quite a few things to work on as I did not get started on all 9 of the things that the tutor wanted us to do on day two. Once I have finishe doing all of the design ideas & have my 50 drawings, they will then be made into a book.


That will be another post


Hope you have enjoyed reading about this workshop & try some of them for yourself. And who said you could not draw ☺ Have fun & happy creating.


Big Hugs Your Friend Elizabeth xx

Monday, March 7, 2011

Module five

Module five. For this module I hand made a book to display all of my samples in. In this module we looked at form & figures.


Most of the pictures that I have used for this are of me & my family, throughout the ages. Like in all of the other modules if you click on each of the images, you will bring the photo up in another page & see more clearly what I have written.


This question we looked at paper manipulation. This experiment was rather challenging as paper does not take to too many manipulations.
We then had to photograph the eight pieces in different lights to see what images the shadows cast, this was quite interesting. I have not added all of the photos that I took as this would take up a hole blog post on its own.
After doing the paper manipulations we then had to choose four of the paper ones & translate them into fabric. This experiment was a lot easier as fabric is a lot more forgiving than paper.
Then I was able to bring out my inner child☺ We had to create a picture using pasta. Sorry the photo is on its side. My computer would not put it right, even though I did change it in my photograph program.
Once we had made our pasta pictures we then had to colour it to bring out the fullness of the picture created.
Working with natural dyes. We had to dye fabrics to create skin colours, using all natural dyes. Things like tea, coffee, curry powder & so on.


My most favourite natural dye was from an experiment from Avocado skins. I saw it used on a blog site that I follow, called www.love-stitching-red.blogspot.com The longer you left the fabrics in this dye, the nicer the results I found. This is one I will use again.

After we had created a few different skin coloured fabrics, we then had to use one of them to create a face.
Then onto the body. The pattern pieces where supplied by the teacher for this part, we just had to construct the body. Some say that she looks like me when I go to the beach☺☺ Not anymore though as I have had my hair cut & coloured brown now☺
We then looked at facial features.


Hands
Then onto doing figures in action. When I first read this lesson, I was a little scared. I had never done a figure in action. Well I thought I hadn't. Anyway, I asked my trusted model to jump on the trampoline for me, & I took photos. When I was happy with one of them, I then copied it it onto A4 paper, then traced around the body shapes to help get the patterns needed.


I have modified the back ground to suite & have left off the cardigan. Mainly due to time frame.
Next was looking at historical figures. We had to reproduce a figure done from history. Luckly for me a good friend Arlene had been to the English Embroiderer's Guild & had taken some lovely photos of historical stumpwork pieces. She was kind enough to give me copies of the photos, & from this I came up with the perfect piece.

The figure that I choose to do was from a box dating to circa 1650. It tells the story of David & Bethsheba.


Replicating the fabrics to look as though they where made 100's of years ago was the hardest bit. But I think I have hit the nail on the head so to speak.


Then we moved onto doing a fantasy figure. This one I had lots of fun with, as I quite like fairies. And am going to be making an interactive stumpwork embroidered book. I decided that this piece would be the cover to the book, & that all the major peices of work that I have to do for this course, would be based around a book.


Then we looked at pushing the bounderies. We had to make a cloth doll from scratch. This part I had already done. As I have made cloth dolls in the past. These two are my own designs & are just two of the four or more that I have designed.

I sent in Cher the doll in black.
Major piece. For this we had to design an embroidery that had both adult & child in it. As I was wanting it to be another page in my book, I based it around a piece that I had done in an earlier module. The finished piece is called "Beyond the Garden Gate"


The page that I have designed is based on a bi fold system. This adds to the inter activeness of the book.

These are images that I obtained from the internet to help me to work out how I was going to do a little girl on a swing.

Here again you can see my trusted model. This time posing on the swing. Doesn't she make a great model?☺
This is looking at the page with the bi fold open, & showing the inside of the garden wall, & the people beyond it
This gives a close up of the people in the garden
And this is the page closed. When I get it back from being marked. I will add it to the front cover that I made earlier in the module.
Thank you all for sharing my journey with this course. I will add module fours work soon. This will be the last of the module that I have to share with you all.

After this I will start sharing with you all my adventures with book making. I have found this very fun, & have made quite a few books. Some I still have but most I have given away as gifts to friends.

See you all in my next post.
Your Friend Elizabeth XX