Module five. For this module I hand made a book to display all of my samples in. In this module we looked at form & figures.


 Most of the pictures that I have used for this are of me & my family, throughout the ages. Like in all of the other modules if you click on each of the images, you will bring the photo up in another page & see more clearly what I have written.


 This question we looked at paper manipulation. This experiment was rather challenging as paper does not take to too many manipulations.
 We then had to photograph the eight pieces in different lights to see what images the shadows cast, this was quite interesting. I have not added all of the photos that I took as this would take up a hole blog post on its own.
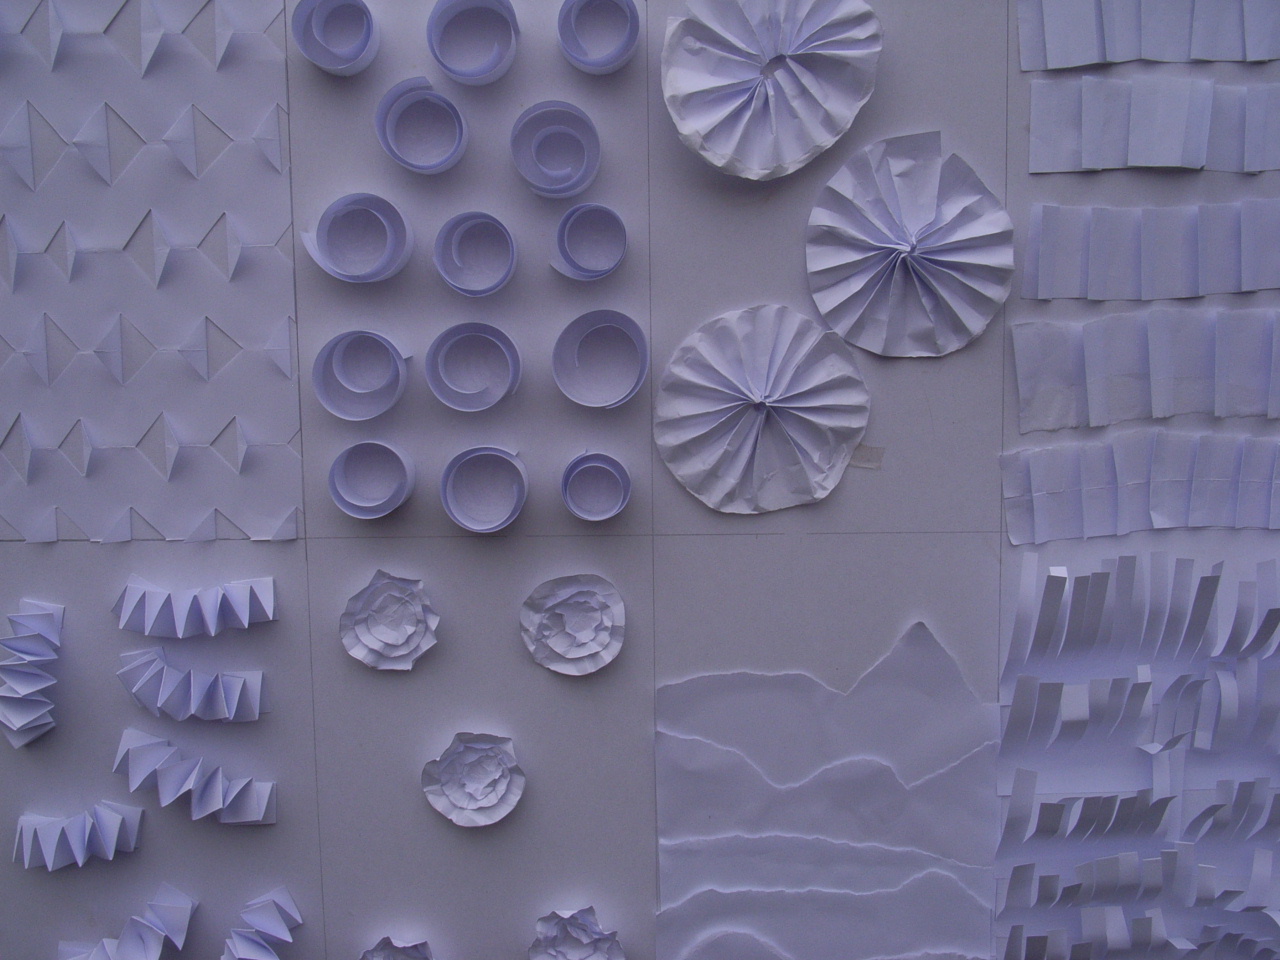 After doing the paper manipulations we then had to choose four of the paper ones & translate them into fabric. This experiment was a lot easier as fabric is a lot more forgiving than paper.
 Then I was able to bring out my inner child☺ We had to create a picture using pasta. Sorry the photo is on its side. My computer would not put it right, even though I did change it in my photograph program.
 Once we had made our pasta pictures we then had to colour it to bring out the fullness of the picture created.
 Working with natural dyes. We had to dye fabrics to create skin colours, using all natural dyes. Things like tea, coffee, curry powder & so on.


 My most favourite natural dye was from an experiment from Avocado skins. I saw it used on a blog site that I follow, called www.love-stitching-red.blogspot.com The longer you left the fabrics in this dye, the nicer the results I found. This is one I will use again.
 After we had created a few different skin coloured fabrics, we then had to use one of them to create a face.
 Then onto the body. The pattern pieces where supplied by the teacher for this part, we just had to construct the body. Some say that she looks like me when I go to the beach☺☺ Not anymore though as I have had my hair cut & coloured brown now☺
 We then looked at facial features.


 Hands
Hands Then onto doing figures in action. When I first read this lesson, I was a little scared. I had never done a figure in action. Well I thought I hadn't. Anyway, I asked my trusted model to jump on the trampoline for me, & I took photos. When I was happy with one of them, I then copied it it onto A4 paper, then traced around the body shapes to help get the patterns needed.

 I have modified the back ground to suite & have left off the cardigan. Mainly due to time frame.
 Next was looking at historical figures. We had to reproduce a figure done from history. Luckly for me a good friend Arlene had been to the English Embroiderer's Guild & had taken some lovely photos of historical stumpwork pieces. She was kind enough to give me copies of the photos, & from this I came up with the perfect piece.
 The figure that I choose to do was from a box dating to circa 1650. It tells the story of David & Bethsheba.


 Replicating the fabrics to look as though they where made 100's of years ago was the hardest bit. But I think I have hit the nail on the head so to speak.

 Then we moved onto doing a fantasy figure. This one I had lots of fun with, as I quite like fairies. And am going to be making an interactive stumpwork embroidered book. I decided that this piece would be the cover to the book, & that all the major peices of work that I have to do for this course, would be based around a book.


 Then we looked at pushing the bounderies. We had to make a cloth doll from scratch. This part I had already done. As I have made cloth dolls in the past. These two are my own designs & are just two of the four or more that I have designed.
I sent in Cher the doll in black.
 Major piece. For this we had to design an embroidery that had both adult & child in it. As I was wanting it to be another page in my book, I based it around a piece that I had done in an earlier module. The finished piece is called "Beyond the Garden Gate"


 The page that I have designed is based on a bi fold system. This adds to the inter activeness of the book.

 These are images that I obtained from the internet to help me to work out how I was going to do a little girl on a swing.

 Here again you can see my trusted model. This time posing on the swing. Doesn't she make a great model?☺
 This is looking at the page with the bi fold open, & showing the inside of the garden wall, & the people beyond it
 This gives a close up of the people in the garden
 And this is the page closed. When I get it back from being marked. I will add it to the front cover that I made earlier in the module.
 Thank you all for sharing my journey with this course. I will add module fours work soon. This will be the last of the module that I have to share with you all.
 Major piece. For this we had to design an embroidery that had both adult & child in it. As I was wanting it to be another page in my book, I based it around a piece that I had done in an earlier module. The finished piece is called "Beyond the Garden Gate"


 The page that I have designed is based on a bi fold system. This adds to the inter activeness of the book.
 These are images that I obtained from the internet to help me to work out how I was going to do a little girl on a swing.
 Here again you can see my trusted model. This time posing on the swing. Doesn't she make a great model?☺
 This is looking at the page with the bi fold open, & showing the inside of the garden wall, & the people beyond it
 This gives a close up of the people in the garden
 And this is the page closed. When I get it back from being marked. I will add it to the front cover that I made earlier in the module.
 Thank you all for sharing my journey with this course. I will add module fours work soon. This will be the last of the module that I have to share with you all.
After this I will start sharing with you all my adventures with book making. I have found this very fun, & have made quite a few books. Some I still have but most I have given away as gifts to friends.
See you all in my next post.
Your Friend Elizabeth XX